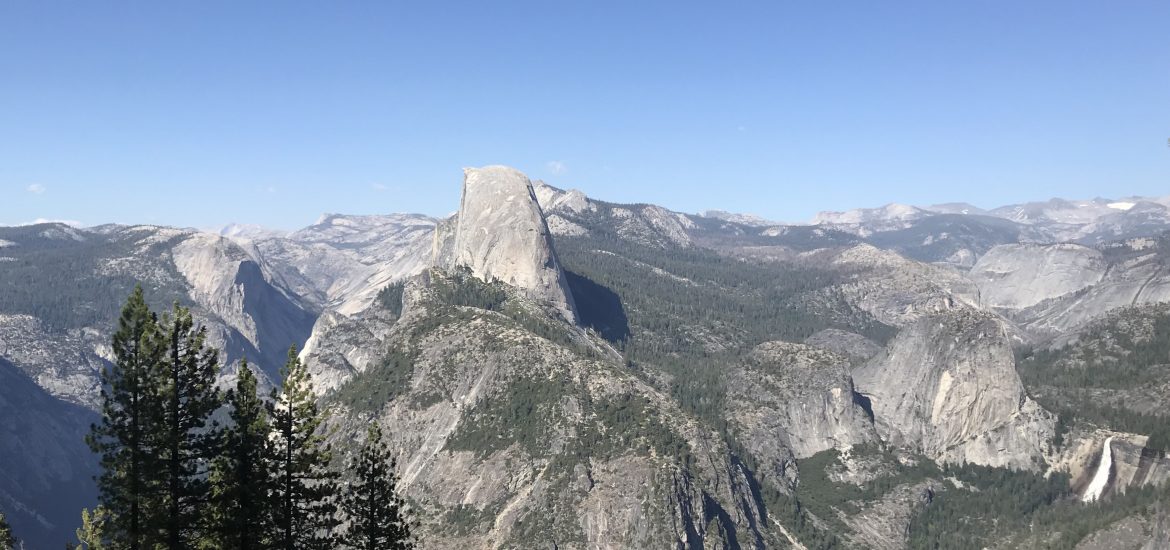
Less than a year ago, I hated hiking. Last week, I hiked 23 miles and climbed to the top of Half Dome in Yosemite National Park. I think I can officially call myself a hiker now, although I am far from an authority in the matter. Prior to Yosemite, I was a non-hiker, best case maybe borderline newbie with <10 hikes under my belt, longest at 4.6 miles.
I’m telling my story as a step-by-step guide with the purpose that it will help ease the anxiety of someone in a similar situation who like me, has no idea what they’ve gotten themselves into. Or to inspire one person in some way – to go outside anywhere or to challenge yourself to do something you were too afraid/didn’t think you were capable of. If nothing else, at least for some amusement at my struggles and rookie mistakes.

The Decision
Visiting Yosemite was always on my list; summiting Half Dome was never. I had a great opportunity to go on a last-minute trip and with my newfound interest in hiking, I Googled Half Dome because that’s the only one I had heard of. 10-14 hours and 17 miles sounded daunting (had zero clue it was that long) but I took like 4 hours getting lost on the aforementioned 4.6 mile one, so I got this. I was eager to challenge myself and test my limits. And just like that, the decision had been made and I was determined to do it (continues Googling).

Permit Process
Wait, you need a permit? I also learned that it’s not to do the hike, but to use the cables that get you up to the top. They allow a maximum of 325 per day (225 for day hikers, 75 for backpackers) and the cables are up around April thru Oct depending on weather. I’m only going to speak on the day hiker permits because if you’re a backpacker, you should probably stop reading this post altogether because you’re way ahead of me, unless you want some laughs at my expense.

Acquiring a permit is based on a lottery that you submit for in March for a set date in the season with notifications sent out in April. Cancellations from that are then available for a last-minute second lottery. Applications are accepted between midnight and 1pm PST two days prior to the day you intend to hike – it’s random so it doesn’t matter when you enter. You will be notified via email by 7pm but we received ours by 2pm each day. We were unsuccessful on the first day even though it was for a Thursday and there were 113 permits available, but one of us got in on the Friday where there were only 86 permits. Weekends are statistically harder to get since there are more applicants but also dependent on number of available permits. If you’re going with others, each of you can apply for up to 6 people to have more chances. If more than one in your party gets it, you can cancel. Cost is $10 per attempt to throw your name in the hat, $10 per permit if you’re a lucky recipient.
If you don’t have a permit and willing to risk it, you can trek the 17 miles and chance it with the rangers. We met a solo hiker who was allowed to proceed without a permit since there were some day-of cancellations. I heard there are other workarounds but luckily, I didn’t have to research that. Link to the application, # of available permits under “Lottery Schedule”: https://www.recreation.gov/permits/234652

What I Wore
With only a few days to prep, obviously the most important thing was my outfit. I read moisture wicking fabric and you don’t want to be weighed down with any sweaty cotton, especially since summer can reach into the high-80s even at that altitude. It was 58 degrees when we started and I had packed lightweight swishy joggers for the morning but ended up leaving them in the car. I kept on a thin heat retaining long sleeve which I took off a couple hours in and didn’t need again the rest of the day. You’ll have to judge what will work for you based on temps and how you feel but keep in mind that every ounce of extra weight counts when you’re trekking for 10-14 hours.
One thing I got wrong were socks. I went with ankle height performance running socks because I didn’t want a sock tan line even though I had been advised by multiple sources to opt for wool hiking socks that go above my shoes. Blisters ensued.

Footwear
This was by far the most difficult decision which took up the majority of research and prep time, much longer than the 5 seconds to decide “should I attempt Half Dome?” I had only hiked in trainers due to a severe aversion to atrocious hiking boots but I kept reading that having good grip and ankle support was necessary. So I went to the place where I knew I would get the most honest and quickest feedback – Instagram story poll. I was trying to get away with wearing super comfy Adidas Ultraboosts but disappointingly, no one would condone it.


Then in the final hours of the 24 hour poll, my saviors came through – four experienced outdoorsy people I trust said I don’t need boots; for Half Dome, all I needed were trail runners/low hikers with a good grip, box toe protection, and ankle support. I would later learn at REI that it doesn’t even have to cover the ankle to provide support and that low hiking shoes are actually a thing. Also, I didn’t have time to break in boots which apparently is also a thing.

REI Experience
REI deserves it’s own section because this place is like Costco/Target/Sephora for the outdoors: it has everything, you go in needing one thing and come out hundreds of dollars poorer. 💸 I used to think the outdoors was free but you pretty much have to be rich to afford the gear to go do free things outside.
The people there are so nice – both the employees and other shoppers – but the latter are more helpful. The employees are trying but just look at the shoes they brought me after I gave them my Insta poll list with the caveat that they not be hideous and resemble trainers rather than hiking boots:

He made me try them on and I must admit they were extremely comfortable but LOOK AT THEM. I was bonding with another shopper who was in the exact same situation – both of us in our Rainbow sandals, shopping for trips departing in 1-2 days, hating on all the options – when in walks a lady in her 50s with purple streaks in her hair. She was pretty and fit with fake boobs, wearing head-to-toe Lululemon and Gucci slides, and says, “I have the boot version of those and they are my favorite. No one cares what you look like up there.” Both of us were in awe as she proceeded to tell us about her summit to “Kili” (Kilimanjaro in non-hiker layman’s terms) and Everest Base Camp. But she still couldn’t change our minds because those shoes are butt ugly.

Sadly, trail runners really don’t offer as much support and I was afraid I would twist my ankle on a loose rock and not make it to the cables so I gave in and settled on these Salomon hiking shoes somewhere between form and function to mitigate the risk. I wanted the non-waterproof version because all the snow is gone, they’re less stiff/more breathable, $30 less, and the grey color they come in are cuter, but they didn’t have it in my size so I was reduced to these GTX = Gore-Tex = waterproof.

Lesson Learned
Get what feels right and embrace the uglies – I definitely needed more than tennies but might have been better off with trail runners that have good grip and sturdy ankle support/toe protection. These Salomon hiking shoes were still a little clunkier than I needed. Even though my options were limited vs buying online, I’m glad I was forced to go to REI to try different ones on since I never dressed up as a lumberjack for a costume party and didn’t know how they’re supposed to feel.
Also, everyone wears ugly shoes on the hike and truly, no one cares. I’m actually starting to think hiking shoes are kind of cute. What have I become???

Conditioning
Since it was a spontaneous trip, the only conditioning I had time for was in Yosemite. To break in my new shoes, I did Taft Point to sunset at Sentinel Dome, a 5.1 mile loop, the day before Half Dome. That’s right, I did the longest hike of my life the evening prior to the longest hike of my life.


I highly recommend doing these (Sentinel, in particular), especially if you’ve never hiked. They are moderate difficulty, very manageable, and a great way to get into hiking because the views are astounding (you can easily do them in trainers and get the cutest pictures). Trail map with GPS can be found on All Trails, my favorite the only trail app I’ve ever used. I would not, however, recommend doing it the night before Half Dome. Instead, spend the day relaxing on the river or walking around Mirror Lake.

If you have more time for long-term conditioning, practice on a longer hike to get used to walking for hours, or go to Europe. The hike is actually not too strenuous, it’s more to build stamina for your body/mind. But there are parts that have a lot of stairs/steep incline that I wasn’t prepared for and could’ve used some Stairmaster work. Also, the cables take upper body strength which I have none of so maybe a rowing machine or some type of strength training. It’s all doable without any conditioning if you exercise regularly; additional prep would’ve just made me not feel like such a mouth-breather panting, doubting my ability, and taking multiple breaks when the going got tough.

Lesson Learned
Carbohydrates are a lie – key mistake here was listening to a how-to Half Dome blog about carbo loading the day before. In addition to being a non-hiker, I’m also a non-runner but heard that you’re supposed to eat a ton of carbs before running a marathon so naturally, that should also apply to an extra-long walk? With that generalization, I ate all the carbs in sight with no control whatsoever – pizza, nachos, Cheez-Its, an entire box of cereal, etc. On the day of the hike, I felt disgusting, bogged down, and lethargic. Maybe they meant whole grains and sweet potatoes, but where’s the fun in that? I should’ve just stuck with my normal diet of just a half a box of cereal and chocolate.
What I Brought

- Snacks – I added some beef jerky that were in the car, ate everything except for some almonds and 3 bars
- Pedialyte for electrolytes
- Water – 3-4 liters is recommended. I drank 24 oz in the car ride there so I’d start out hydrated and not have the extra weight to carry
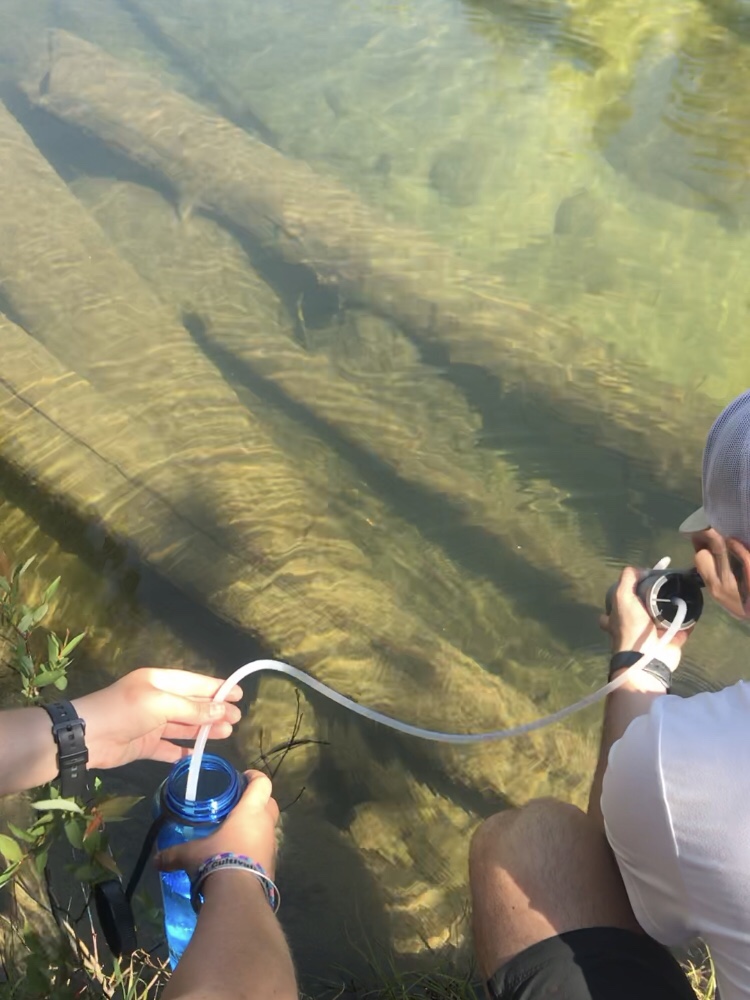
- Katadyn Water Filter – this was critical. It allows you to filter drinkable water from the Merced river. Jump to “Water Shortage”
- Gloves with grip for the cables – MaxGrip Pro work gloves were recommended but I wanted something I would use again so got a new pair of workout gloves which I will subsequently leave at the gym like all the pairs I’ve ever owned. There are discarded gloves at the base of Half Dome if you need but the rangers ask not to do that since they have to throw away so many every day. I can’t imagine doing the cables without gloves so these are a must
- Hat and 🕶 – it will probably be dark when you start your day so remember to pack these
- Band-aids/lip balm/sunscreen/face sunscreen/toilet paper/tissues/wet wipes – the Band-aids were a lifesaver for the ankle sock blister snafu
- Mophie battery for phone, especially if you’ll be taking pictures – lighter than an external charger
- Extra zip-loc for trash
- Not pictured – extra socks (came in clutch), ear buds for music, extra water bladder pack
Things I Didn’t Need
- Advil – but it was good to have since I didn’t pack a full first-aid kit like some recommend
- Flashlight/headlamp – I left it in the car since it was already daylight when we started and I was confident we’d make it back before sunset
- Insect repellent
- ID/credit card
Things I Wish I Had
- More beef jerky and salty snacks – I was tempted to elementary school lunch trade my arsenal of Whole Foods bars for the Pringles I saw a fellow hiker snacking on
- Fruit
- Moleskin – My frequent distance hiker/backpacker friend told me to get them to which I had to ask what they were. She then reminded me three times but I still forgot and they would’ve been really helpful for the blister situation
- A backpack with the water pouch straw thing

The Route
Mist Trail on the way up, John Muir Trail (JMT) on the way down.
Parking and Trailhead
Start at the parking lot called “Yosemite Valley Trailhead Parking” located just past Curry Village. You’ll walk past a shuttle stop and over Happy Isles Bridge to the trailhead. The Valley shuttle doesn’t start until 7am and you’ll want to be on the trail by sunrise. A hardcore trail runner friend told me to get there at 3am and start in the dark to be the first at the cables to avoid the congestion (jump to The Cables). He has a point but that is way too extra for a novice. With a 6am sunrise, my goal was to start at 5:30am. I embarked at 6:15am, not bad.

Vernal Falls
I was bright-eyed and bushy-tailed as I embarked on a paved moderate incline up to the base of the falls. This will also be the last (only?) place to refill water at a trough looking sink just past the bridge. The paved walkway turns into stairs alongside the falls and the magical mist of this aptly named trail starts to become apparent. Be prepared to get wet.

People were already taking their first snack break at the top of the falls about 2 miles in. I was still feeling the rush, though and wanted to keep going. That enthusiasm was short lived as the incline got steeper and the trail starts to get all Lord of the Rings. As the first signs of boredom and struggle set in, it hits – it’s only 7:30am, I’m already hungry, and I have 15 more miles of this…what have I done???

Nevada Fall
We took the first snack break amongst these Ents somewhere between Vernal and Nevada which was almost all stairs for 1.5 miles. Second snack break was at the second merging point of Mist Trail and John Muir about 4.5 miles in (the first time they meet is around Vernal). There were a lot of other hikers stopped here since it’s the first open flat area after all the uphill. After this meeting point, it’s JMT until Half Dome Trail.

Just a little more slight incline and you’ll reach a sandy flat trail along the Merced toward Little Yosemite. This was my favorite part of the hike. It was easy, not that hot yet, and there’s Half Dome in view on the left to reinvigorate motivation and the calming river on the right.

Little Yosemite
This goes on for a while until you reach Little Yosemite (the campground if you were to overnight backpack Half Dome) and ranger station – when you see the restrooms outhouse in the distance on your right, you’ll know it’s the end of respite. It is the last bathroom on the way to Half Dome and the last source of water (pumping from the river through the filter you brought). It’s an uphill battle from here on out (see what I did there? 😉)

Half Dome Trailhead
A short way up from Little Yosemite will be where Half Dome Trailhead splits from JMT. It’s mostly inclined switchbacks through a forest grove. Third break taken at a bendy part of this and realizing that a blister is happening. There may have been one more short break in this section but I can’t remember because it seemingly went on forever. At this point, the “are we there, yet?” mental fatigue sets in.

You will eventually reach a shady viewpoint where others will be stopped. This a good place to break because the next part is the absolute worst: Sub Dome. Just know when you get your permit checked, it’s over – or has it just begun? 🤔 This will also be your last opportunity to find a hidden spot to handle your business. A girl popped a squat and peed in front of everyone at the summit of Half Dome.

Sub Dome (also referred to as Quarter Dome)
After a grueling morning, this is the one thing keeping me from the cables. You’d think, “wow, I just hiked 8+ miles, what’s another little hill? NBD”. I was clearly not prepared for this – it’s completely exposed, might as well have been a 175 degree incline (I don’t understand elevation gain numbers so that’s all I got), and I was tired and over it.

Half Dome
The torture mountain eventually levels out after scaling up some granite boulders to the base of Half Dome. This is where you’ll want to water/snack/rest and put on your gloves. Take the break because the cables can get backed up and unless you’re an avid mountain climber, you’re not going to want to let go to get in your pack once you start the climb.

The Cables
It took 33 minutes to reach the top, most of it spent waiting. Just like regular traffic, a lot of it is due to bad/nervous drivers. I was fine starting the ascent but as it got steeper, I was relying on my arms to pull myself up more than my legs to propel. This is where I reached my pinnacle of fear. I was afraid I’d lose my grip or my arms would give up, miss the next cable grab, and fall back, taking everyone down with me. Having to constantly stop for traffic and looking back at how high up I was didn’t help so I brushed aside that temptation and kept my focus forward.
When I felt I got the hang of it and more sure of myself, the next rush of fear came seeing people cautiously backing their way down, sliding all over the place, and that one would come tumbling. The other anxiety was singing “what goes up, must come down” spinning ‘round in my head. My worries were assuaged by fellow climbers making the descent and offering words of encouragement. I made sure to continue that cycle of positivity on my return trip.

The Planks
When I had read about them, I imagined a wide ledge, like a pirate ship plank that somehow was nailed at an angle like a stair so you could stand on it and let people pass. I didn’t know they’re actually thin pieces of wood nailed flat to the rock giving you just enough inches to provide a foothold. Even though they weren’t as expected, I think I would’ve died and killed a bunch of people if they weren’t there.

The Summit
I must’ve said “I can’t believe I’m here” at least 5 times and thought it many more. It’s just something I never imagined doing. I’d like to say it was because I didn’t have the desire to do it – that I didn’t enjoy hiking. But I think it was more feeling limited physically, like I thought there’d be no way I could do it. And since it took so much effort getting here in many ways, I was in no rush to leave and spent a good 1.5 hrs reveling in it (and taking photos, obv).

The Descent
I had been dreading going down the cables ever since the day the permit made it real. Some had told me they used belt clips, unhooking and rehooking after each pole. Many said they couldn’t look down and had to walk it backwards facing uphill. I would get the heart drop feeling thinking about it and it was for sure the biggest fear I had leading up to it.

To my utter surprise, going down felt so natural. Even when I was sliding a bit, it was kind of like skiing – I had cables/poles for stability and the planks would help slow it down like my skis making a pizza. It honestly was really fun and exponentially easier than the ascent. Funny how we can get so worked out about things in our head that end up being inconsequential.

The Return Trip
Even descending Sub Dome wasn’t terrible despite it being really hot with no shade cover. Once we reached the base, we found a different shady viewpoint to replenish electrolytes and break for the long forest-y trek. It was much easier physically going down but equally as boring. I was just looking forward to reaching Little Yosemite and the start of my sandy flat path.

Water Shortage
At this point, it seemed pretty much everyone underestimated how much water they would need and had come unprepared. Six people who had summited with us had run out of water and desperate enough to drink directly out of the river. Thankfully, we were staying in Yosemite with Half Dome experienced friends who gave us the Katadyn Water Filter to bring and help everyone out. So either bring more water than you think you’ll need (something about altitude) or a purifying pump.
Mist Trail vs JMT
After getting back to where JMT merges with Mist Trail, you’ll have a decision to make. Going down the way you came (Mist Trail – right side of the clearly marked signs) is 1.5 miles shorter but steep steps down. Staying left and continuing on JMT is longer but more gradual. Most of our new friends just wanted the fastest way out and took Mist Trail. I wanted to experience different sights so opted for John Muir, even though my energy levels were quickly fading.


After this viewpoint, things went downhill – literally and figuratively. All the previous downhills were fine, albeit a bit uneventful. This one was brutal. My body felt okay, exhausted but no cramping or soreness, but my mental state was crumbling. I was miserable and just wanted it to be over.

Home Stretch
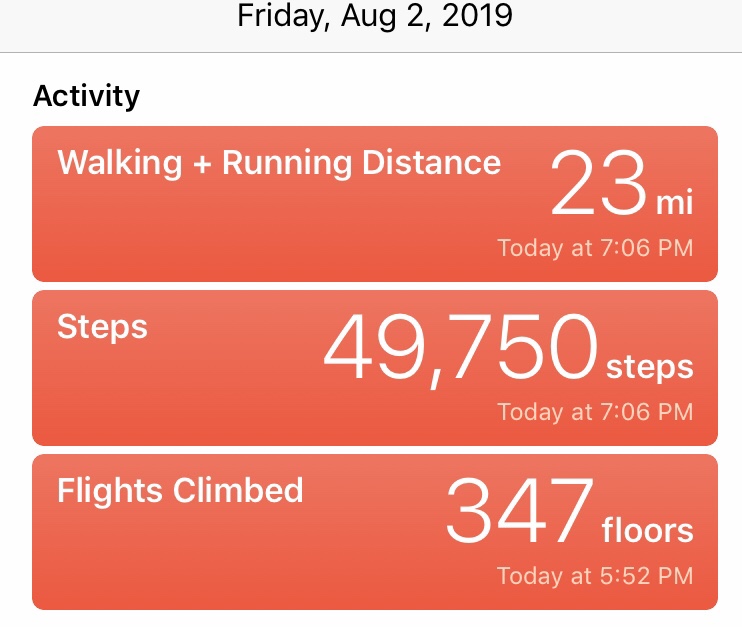
I tried running so it would end faster but didn’t get very far and would have to do it in spurts. Listening to music and (embarrassed to admit) taking selfie videos talking about how dead I was helped distract my mind from how much further I still had to go. The final bit that got me through was looking at the activity log on my phone and feeling proud of what I had done. Reached the car around 6:45pm – total time ~12.5 hrs.

(Curry Village Coffee Corner)
Post-trip State of Mind
I wish I had something profound to say, or that I had some spiritual epiphany, but I don’t. Maybe it’s because I thought it would be harder from what I had heard compounded with self-doubt. Physically, it was one of the most difficult things I’ve done in terms of endurance since I’ve never participated in a distance anything – but I honestly expected worse. And despite several bouts of internal struggles, it wasn’t as mentally challenging as anticipated either. If it’s any indication, I embarked on the 5.6 mile Mariposa Grove Trail the day after. However, I got lost a few times so it ended up being closer to 8 miles and had a full on meltdown. Yep, I went on the second longest hike of my life the day after the longest hike of my life.

(Mariposa Grove Trail)
Probably the deepest thing I’ve got is that I underestimated myself. And even though it was intense and certainly a personal achievement, I’m still selling myself short by telling myself that it’s not that big of a deal – hundreds of people do it every day, my friend’s 12-yr old did it. Like “okay, checked it off the list”; glad I did it but I wouldn’t do it again. I’ve already proven to myself that I can and it just makes me want to chase the next thrill and test my limits even further. It’s a sickness.

Final Lesson Learned
I’m a complete masochist. Don’t be surprised when you see me on top of Kili in horrendous hiking boots.
Thank you thank you thank you for sharing. A great read and a very honest outlook from a “non-hiker” is much appreciated. Did you feel like the shorts you hiked in were comfortable? They are so cute, I would like to know where you got them and if you recommend them.
Hi Haleigh – thanks so much for reading and the kind words! I’m so glad I went with the shorts but I’m also used to them since it’s what a wear for my regular workouts (hip hop dance and spin). I tried on runners/hiking shorts but those built-in mesh brief things underneath are so uncomfortable to me. But you should get what you’re most comfortable in since you’ll be walking in them all day. I also like them tighter bc people will literally be looking up your butt on the ropes part of the dome and I didn’t want to have to worry about it with loose shorts.
I got them a long time ago but they’re Lucy brand which got bought out by North Face so I don’t know if you can get them anymore but whatever brand you typically like should have something similar. You just want to avoid cotton since it’s not as breathable and holds onto moisture but any of the poly type blend materials should work. Good luck conquering Half Dome!!